• You're one step from joining Sewing Forum – DIY Clothing, Pattern Making & Machine Tips.
    Create a free account to post, follow threads, and never miss an update.  Sign up free →

Implementing "Tight Skirts" (Size 88 Focus)

Lumi Journey

Active member
Bronze Member
Joined
Feb 9, 2026
Messages
30
Hello, fellow forum members!

In this first post, I’d like to explain the theory behind drafting a Tight Skirt (Pencil Skirt) and share my basic calculation methods.

I use a 23-inch ruler, so my workflow involves calculating in centimeters first and then converting those figures into inches to match my physical tools.


The Standard: Size 88 (KR)

For this design, I am using Size 88 measurements. These represent the average body dimensions for this size category (Waist, Hip, Hip Length, and Skirt Length).

Why use "Average" sizes instead of personal measurements?

As a beginner, using individual body measurements can lead to errors because personal "reference lines" are often inconsistent. By establishing a solid baseline using average body measurements first, it becomes much easier to apply custom alterations later.


My Goal

I want to share the process of finding problems and discovering solutions while drafting for a standard figure. As a hobbyist, my designs aren't perfect yet, but I am driven by the desire to create perfectly fitted, customized clothing through iterative refinement. I'm sharing everything here so we can all learn how to identify and fix pattern issues together.

My Rule of Thumb: I stick to a 3-fitting rule (making three muslin prototypes). Before cutting fabric, I always create a "Pattern Sample Work Sheet" to guide the process.

Feel free to share or use this information if you are a fellow hobbyist! I plan to continue uploading my project progress here. I appreciate your interest!


Average Measurements for Size 88 (Women)

(Note: These are standardized tailored measurements, not specific to one individual.)

  • Waist Circumference: 92 cm
  • Hip Circumference: 112 cm
  • Hip Length: 20 cm
  • Total Skirt Length: 60 cm


Drafting Tips

  1. Ease Allowance: It is best to add 2–4 cm of ease to the hip circumference. Since I am using 14-count cotton calico (muslin) with no stretch, I have opted for 4 cm of ease.
  2. Dart Distribution: Usually, 3D volume is created with two darts in the back and one or two in the front. To accommodate abdominal protrusion, I have distributed the darts 2:2 (Front:Back). I chose this because waistbands sometimes sit at or below the navel; without proper dart placement to follow the curve of the abdomen, the fabric can look awkward or "protrude" flatly. This is a hypothesis I am testing!
  3. Front vs. Back Balance: For figures with a prominent abdomen, raising the back waistline by 0.5–1 cm above the base line during drafting helps prevent the skirt from "hiking up" in the front when worn.


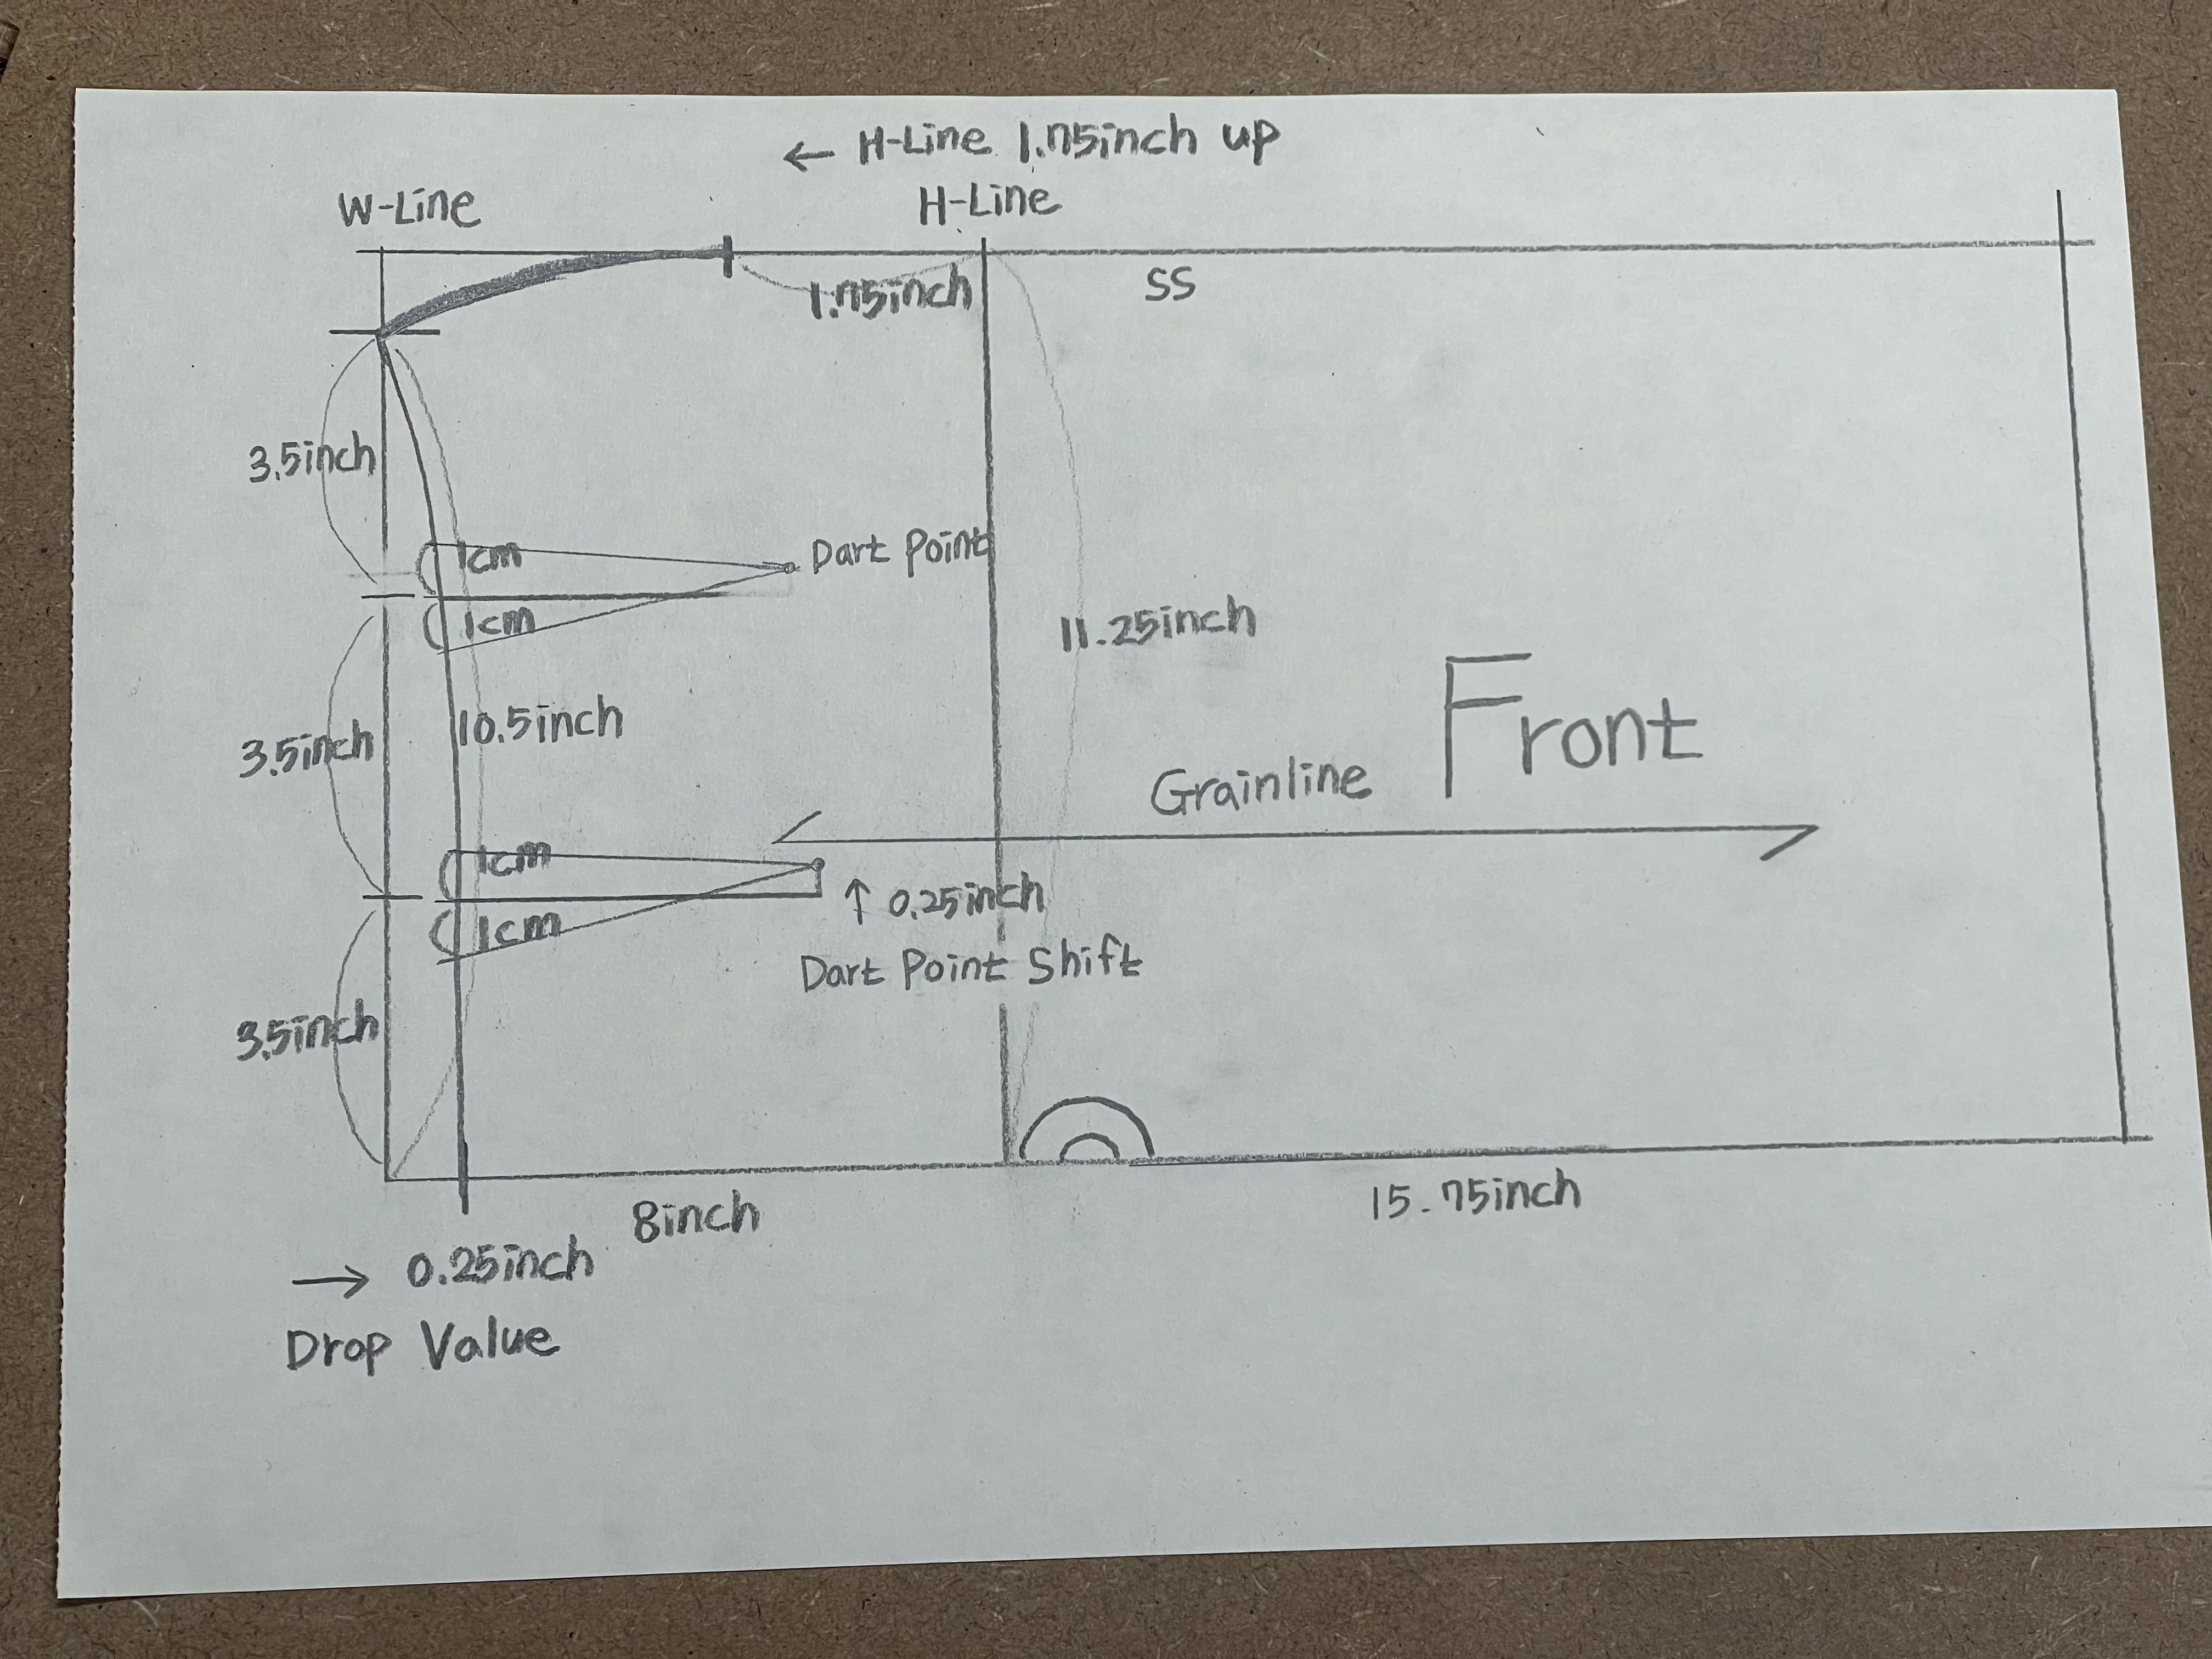
[ Calculation Logic: Front Panel ]

0. Basic Dart Distribution

  • Total Dart Amount: (H/4) - (W/4)
  • 28cm - 23cm = 5cm
  • Distribution: Front 2 cm / Back 3 cm

1. Basic Hip Line (H-Line)

  • Width:(H/4) / 2.54 + Ease = 11.25 inches
    • 112cm / 4 = 28cm
    • 28cm / 2.54 = 11.02 inches
    • 11.02 + Ease = 11.25 inches
  • Vertical (Hip Length):
    • 20cm / 2.54 = 7.87 inches
    • 7.87 + Ease = 8 inches
  • Drop Value: 0.25 inches

2. Basic Waist Line (W-Line)

  • Width:[(W/4) + 2cm(Darts)] / 2.54 + Ease + 0.5 inch (Extra Ease) = 10.5 inches
    • 92cm / 4 = 23cm
    • 23cm + 2cm = 25cm
    • 25cm / 2.54 = 9.84 inches
    • 9.84 + Ease = 10 inches
    • 10 + 0.5 = 10.5 inches
  • Vertical: Skirt Length - Hip Length = 15.75 inches
    • 60cm - 20cm = 40cm
    • 40cm / 2.54 = 15.75 inches

3. Dart Reference Lines

  • W / 3 (Tri-sectioning): 10.5 inches / 3 = 3.5 inches
  • Dart Width Distribution: Center Front 1 cm / Side 1 cm
  • Dart Length: Center Front 5.25 inches / Side 4.75 inches
  • Dart Point Shift: Move 0.25 inches toward the side seam.

I know the conversion between cm and inches can be confusing! I am working on a YouTube video to explain this more clearly. I will share the calculation method first, followed by a private video link showing the actual drafting process.

If you have any questions, please let me know! I will try to answer them in my upcoming videos.

A quick reminder: I am a beginner sharing my personal journey based on calculations I've studied online. I may not be familiar with professional industry-standard "shortcuts," so I ask for your kind understanding if I can't answer highly technical professional queries!

Thank you!
 
Last edited:
KakaoTalk_20260213_212933418.webp
 
Last edited:
Drafting on 90g Kraft Paper


I’ve put together a video showing how I draft patterns on 90g Kraft paper.
To draft this tight skirt, you will need the following nine tools:

  1. 1.3mm mechanical pencil
  2. Eraser
  3. Pen for labeling pattern parts
  4. Drafting brush (Eraser brush)
  5. Titanium scissors
  6. 60cm curve ruler (Hip curve)
  7. Large L-square (Framing square)
  8. 23-inch straight ruler
  9. 30cm patchwork ruler

Before we dive into the process, there’s a key insight I want to share.
When measuring the dart intake, I use a centimeter ruler instead of an inch ruler.

This is due to the precision of the scale. Relying solely on inch increments can often lead to excessive dart intake, causing the garment to feel too tight and restrictive for the body.

While drafting this on paper, I realized a discrepancy I had noticed earlier in CLO 3D. When I applied an inch-based pattern to a size 44 avatar, the dart volume was significantly larger than the standard requirement.

In conclusion, I’ve developed a hypothesis that a "hybrid scale"—using both inches and centimeters—is essential for custom-fit tailoring. I’ve been applying this principle to my recent pattern designs.


While I’m not sure if my method is traditionally "proven," I am committed to proving my own design foundations by setting hypotheses, identifying errors, and refining the process.

That’s it for the front panel pattern! In the next video, I’ll share the process of drafting the back panel.
 
When drafting a pattern, the key is to apply the Basic Dart Distribution (Front: 2 cm / Back: 3 cm) by adding these values to the width of the Basic Waist Line (W-line). Specifically, 2 cm must be added to the front width and 3 cm to the back width.

The Dart Width Distribution (Center Back: 2 cm / Side: 1 cm) represents the ratio of the total dart width within that 3 cm. When marking the actual dart width, I distribute it intuitively using a centimeter ruler. For example, since I assigned a 2 cm ratio to the Center Back, I might distribute 2 cm or 1.5 cm around the Center Back dart. For the side, since 0.5 cm on each side would be too small to draw effectively, I would likely allocate 1 cm instead.

The reason I describe this process with some flexibility is that the distribution of dart width must be viewed within the overall surface area of the pattern paper. Because the optimal dart width depends on one's personal spatial sense, I distribute them based on these cm ratios.

Regarding the lack of precise calculated values for dart width: I have previously attempted designs based on specific calculation formulas and reference points. However, I have formed a hypothesis that modifying a dart is only possible when using established dart volume rules as a baseline.

Darts are a design method used to represent the three-dimensional form of the human body. Since every individual has unique physical characteristics, standard dart rules do not apply universally. Therefore, I have come to modify the calculations for dart distribution, length, and width by relying on foundational dart principles.

As a beginner still refining my pattern-making skills, I use a method of identifying and correcting issues through hypotheses. Please understand that these hypotheses may not be perfectly accurate, and there is no single "correct" answer. I ask for your understanding that I am currently drafting based on these experimental hypotheses as I work toward mastering precise dart calculation methods.


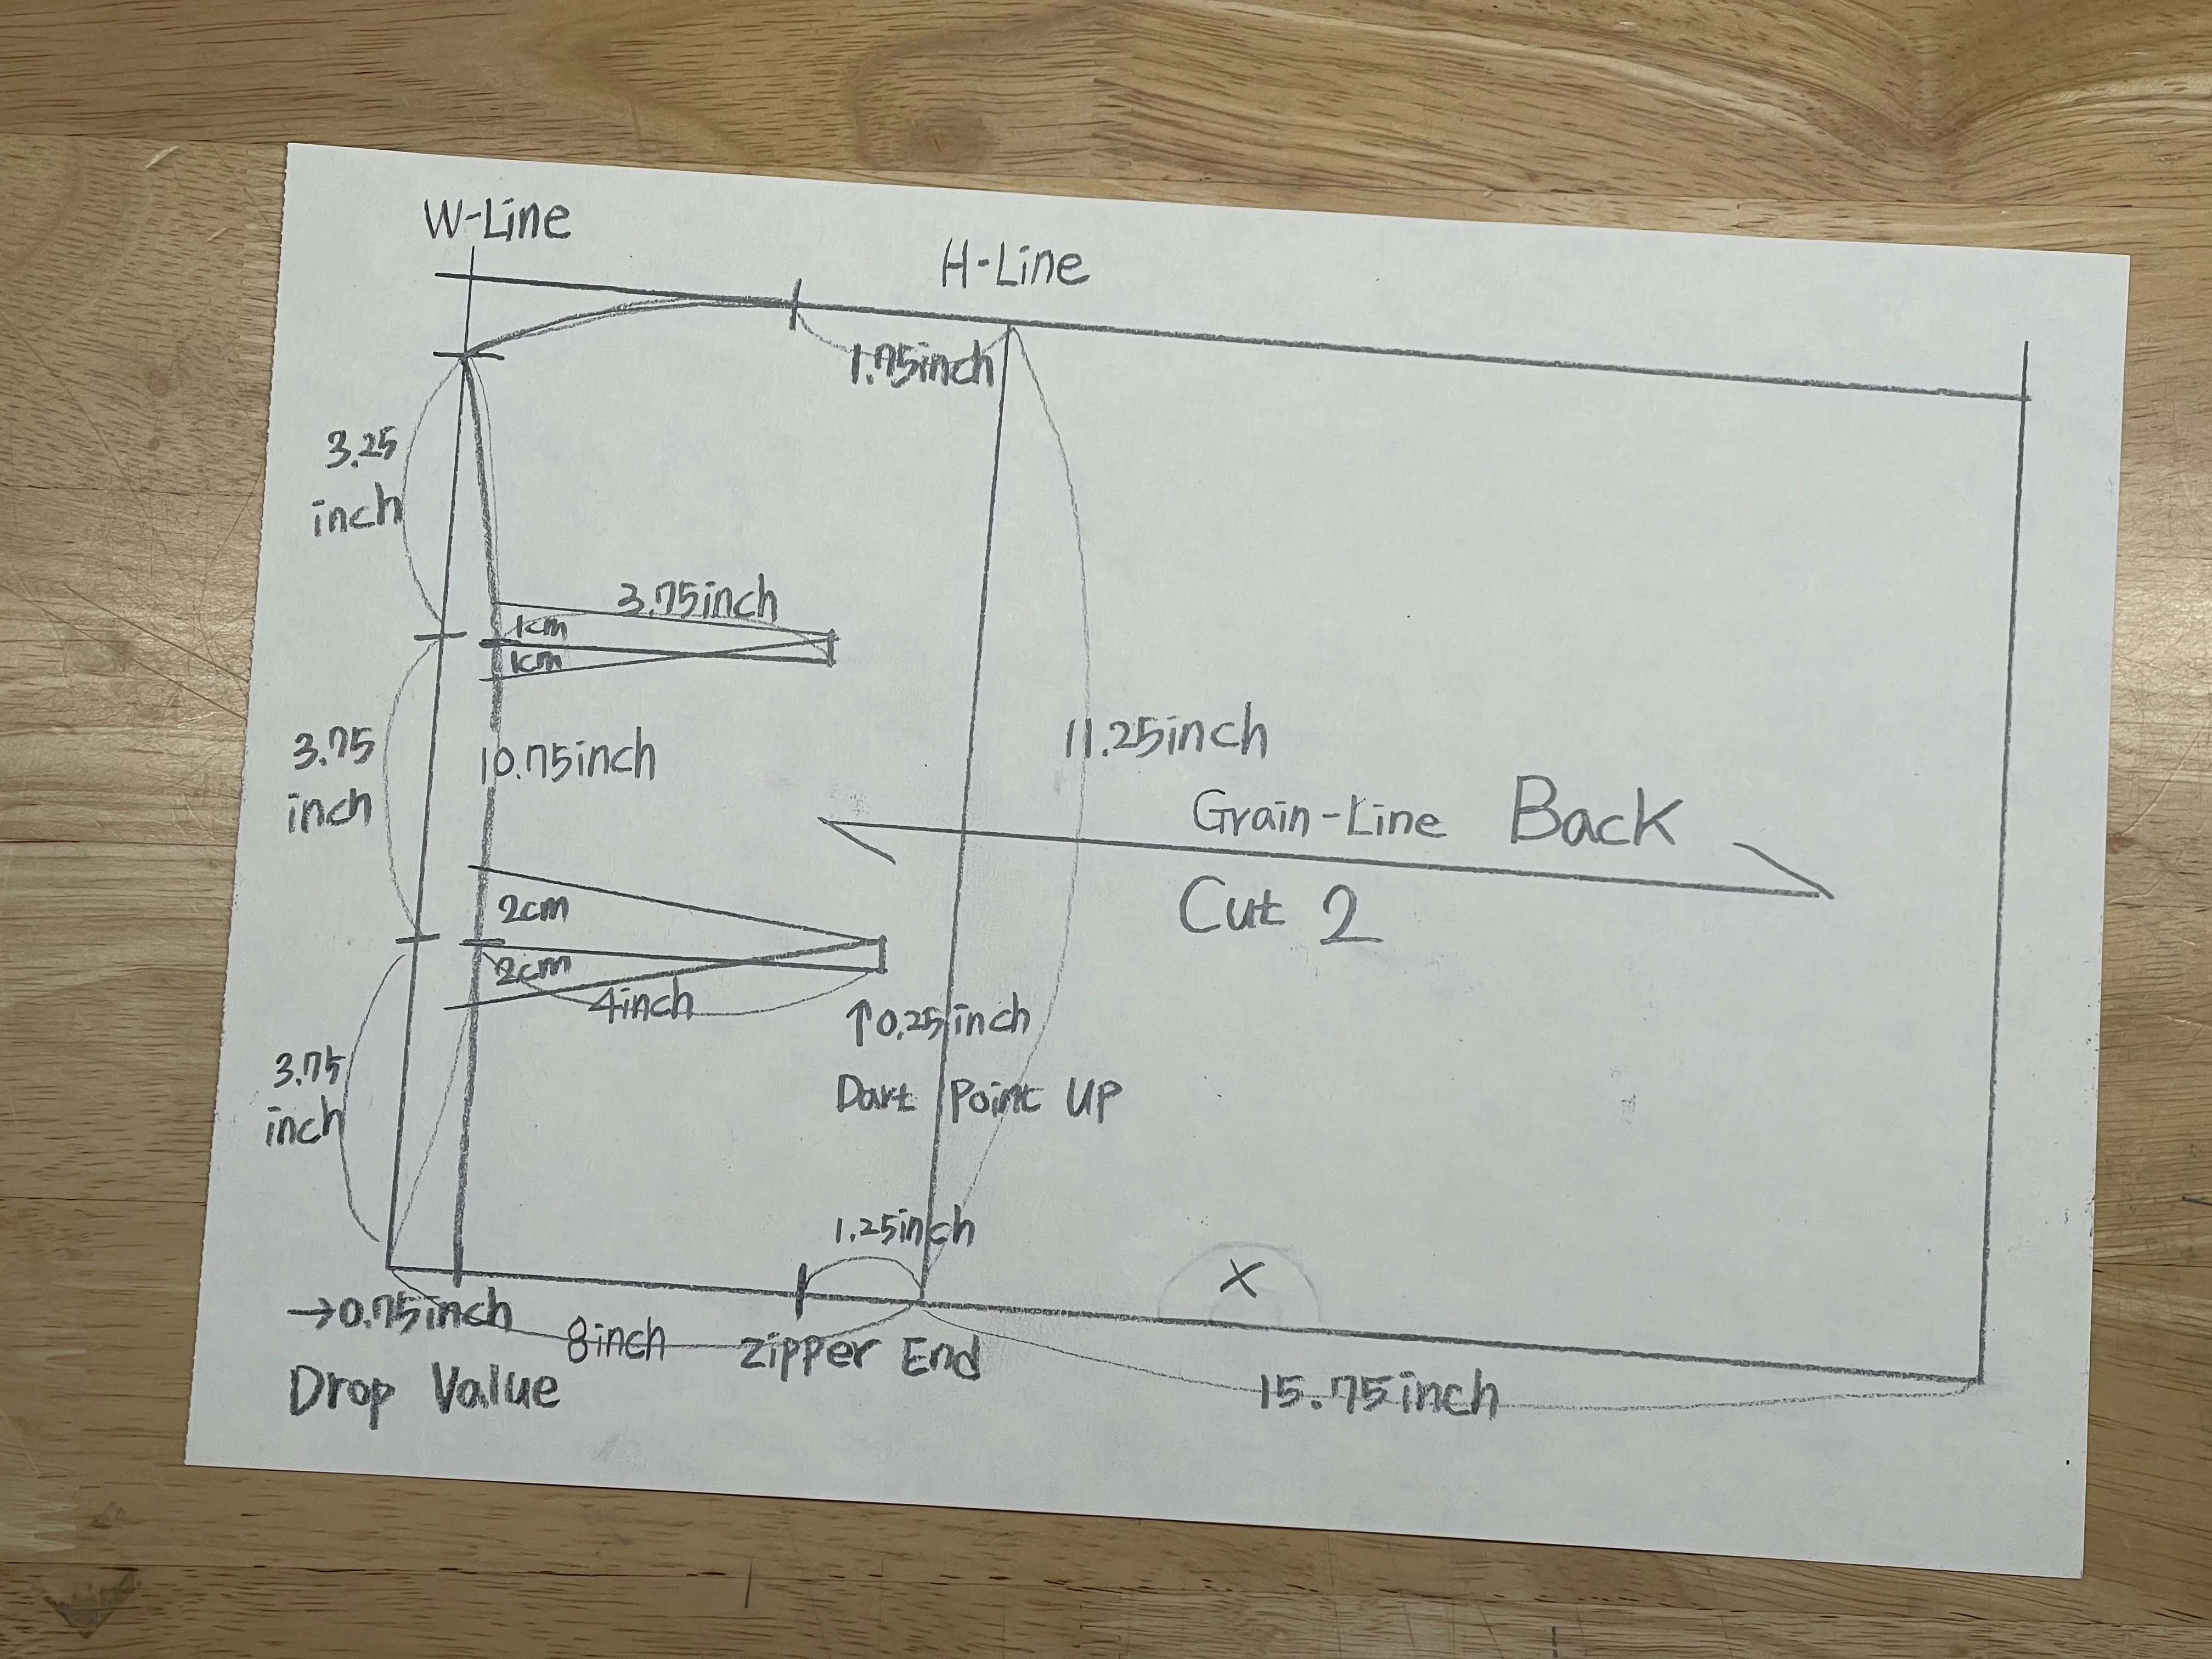
[ Calculation Logic: Back Panel ]​

1. Basic Hip Line (H-Line)

  • Width: ((H/4) / 2.54) + Ease = 11.25 inches
    • 112cm / 4 = 28cm
    • 28cm / 2.54 = 11.02 inches
    • 11.02 + Ease = 11.25 inches
  • Vertical (Hip Length):
    • 20cm / 2.54 = 7.87 inches
    • 7.87 + Ease = 8 inches
  • Drop Value: 0.75 inches


2. Basic Waist Line (W-Line)
  • Add the 3 cm Back Distribution from the Basic Dart Distribution to the width.
  • (Note: The 2 cm Front Distribution must be added to the Front Basic Waist Line.)
  • Width: [(W/4) + 3cm(Darts)] / 2.54 + Ease + 0.5 inch(Extra Ease) = 10.75 inches
    • 92cm / 4 = 23cm
    • 23cm + 3cm = 26cm
    • 26cm / 2.54 = 10.24 inches
    • 10.24 + Ease = 10.25 inches
    • 10.25 + 0.5 = 10.75 inches
  • Vertical: Skirt Length - Hip Length = 15.75 inches
    • 60cm - 20cm = 40cm
    • 40cm / 2.54 = 15.75 inches


3. Dart Reference Lines
  • W / 3 (Tri-sectioning): 10.75 inches / 3 = 3.58 inches + Ease = 3.75 inches
  • Dart Width Distribution: Center Back 2 cm / Side 1 cm
    • (Note: These ratios are for reference; actual distribution is handled intuitively as needed.)
  • Dart Length: Center Back 4 inches / Side 3.75 inches
  • Dart Point Shift: Move 0.25 inches toward the side seam.
 

How to Draft a Straight Belt Pattern

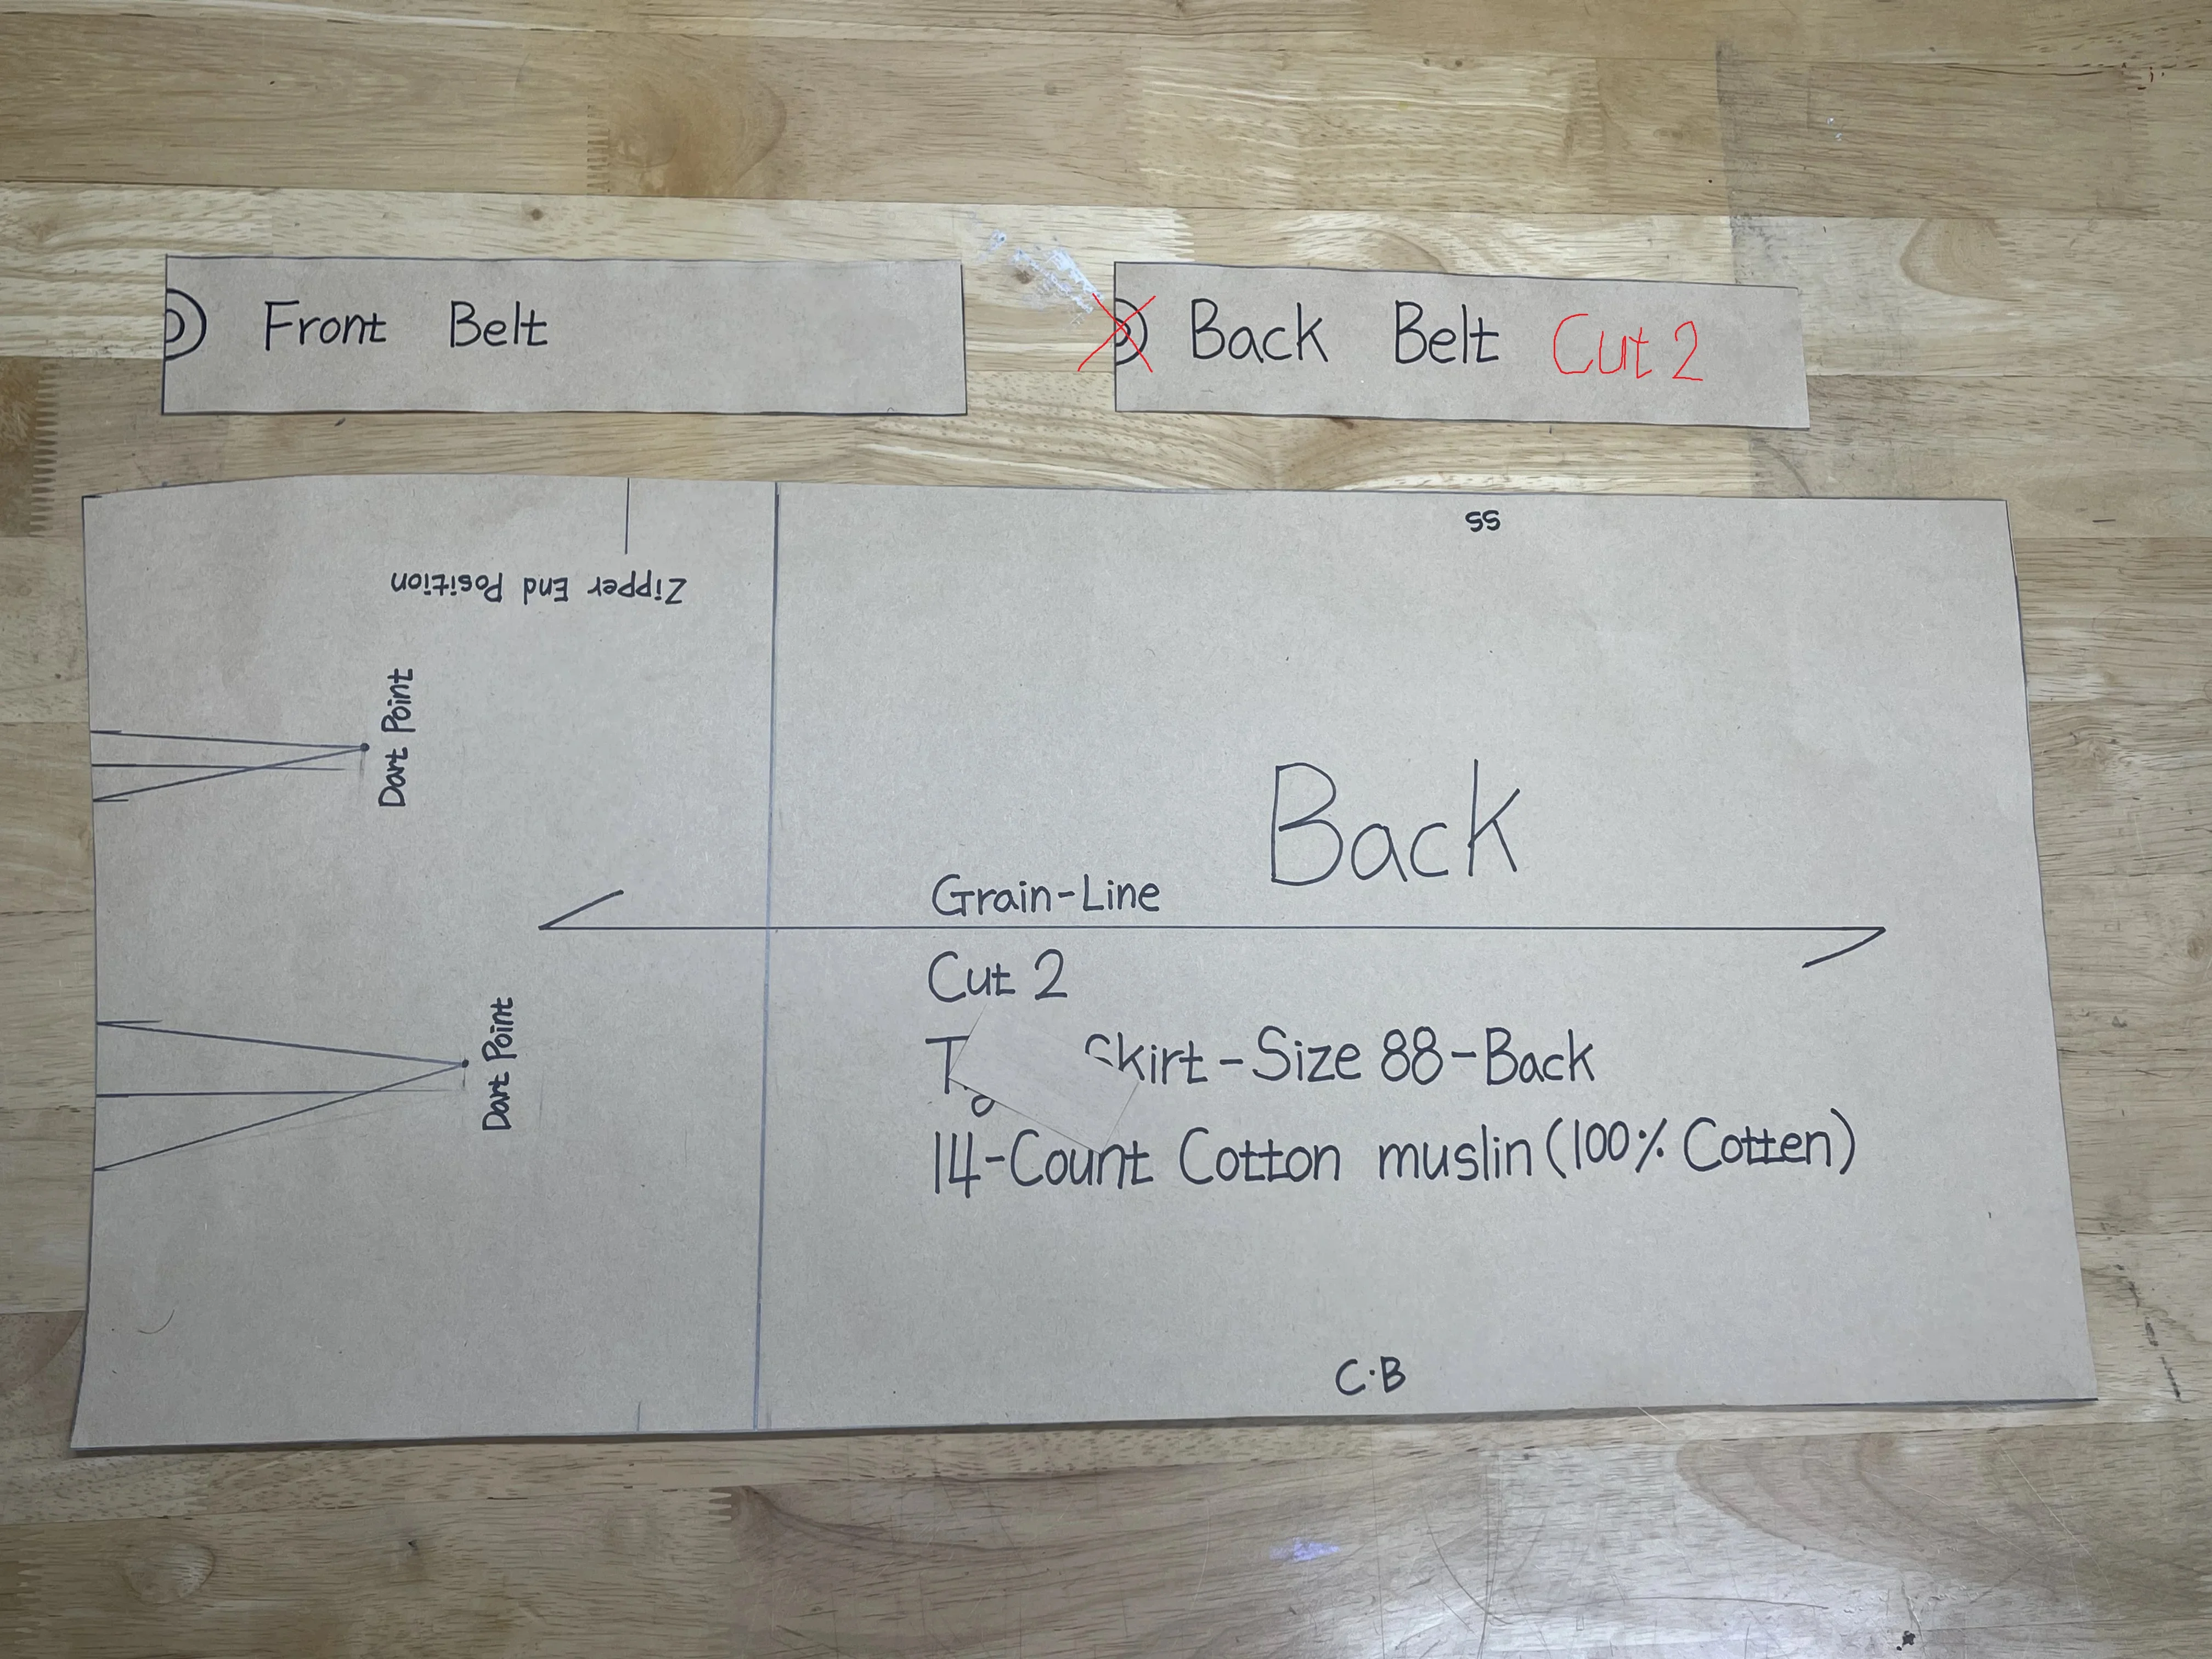
When drafting a belt pattern, using centimeter (cm) calculations is necessary for distributing darts accurately. however, since the Front and Back Waistlines (W-Line) are already measured in inches, you must first convert those inches to cm. Then, when calculating Ease, you should convert the values back to the inch-based method.

While these calculations may seem complex and tedious, drafting with precise measurements on an inch ruler is incredibly useful later on—especially when you need to adjust dart distribution or ease.

Although this is my personal method, it has been a huge help to me even when designing tops. The key is to use this as a reference to eventually establish your own unique drafting logic.


Calculation Formula

1. Front W-Line Calculation

Formula: Front W-Line (10.5") - 2cm (Center Front Dart) - 2cm (Side Seam Dart) + Ease + 0.5"

  • Convert to cm: 10.5 in \ 2.54 = 26.7cm
  • Subtract Darts: 26.7cm - 2cm - 2cm = 22.7cm
  • Convert back to inch: 22.7cm \ 2.54 = 8.93 in
  • Add Ease: 8.93 in +Ease = 9 in
  • Final Measurement: 9 in + 0.5 in = 9.5 in

2. Back W-Line Calculation

Formula: Back W-Line (10.75") - 4cm (Center Back Dart) - 2cm (Side Seam Dart) + Ease + 0.5"

  • Convert to cm: 10.75 in \ 2.54 = 27.3cm
  • Subtract Darts: 27.3cm - 4cm - 2cm = 21.3cm
  • Convert back to inch: 21.3cm \ 2.54 = 8.39 in
  • Add Ease: 8.39 in + Ease = 8.5 in
  • Final Measurement: 8.5 in + 0.5 in = 9 in

74-39ba98ed628c9fa209be4a7d2357918c.webp
 
Last edited:


88 size Famale 160cm.avs

Creating a Female Avatar with Average XL Dimensions

[Steps for Avatar Setup]
  • File - Open - Avatar
  • Select FV2.1_Mia.avt and click Open.

[The Issue with FV2.1_Mia.avt]The default avatar, Mia, is based on international modeling standards—typically a size 0-2 (Korean size 44) with a height over 175cm. Designing an XL pattern on this base model results in a physically awkward and distorted look. Since we are used to seeing designs on this slim avatar in CLO, the visual discrepancy becomes more apparent as the size increases, and adjusting the body manually can lead to unnatural proportions.


[Avatar Editor]
  • Menu Bar - Avatar - Avatar Editor


In the Editor, you will see the Height measurements. To better understand these dimensions, change the unit from Inches to Centimeters. You will notice that the default Mia avatar stands at 175.26cm. Since my height is approximately 160cm, I will reduce the avatar's height accordingly.(Please ignore the warning pop-up regarding size changes; it simply notifies you that the avatar is being converted to a 'Custom' version.)


[Assigning Dimensions for XL Sizing]I will now assign specific, albeit approximate, values to the avatar so it can properly wear the pattern I intend to create.

It’s important to note that calculations differ between physical paper patterns and CLO's digital files. While paper patterns often involve a mix of cm and inch calculations, CLO’s digital patterns are strictly optimized for Inch-based constraints.

  • Weight Adjustment: Under the Width tab, you’ll see the default weight is 50kg (equivalent to a slim size S).
  • To create a body shape that approximates an XL size, we must adjust the Weight value first.
  • If we input an average XL weight of 65kg, the measurements result in a Waist of 80.18cm and High Hip of 97.04cm. However, forcing these specific numbers manually can break the avatar's proportional balance.


In CLO, 65kg does not perfectly align with average XL measurements. Therefore, increase the weight until it matches the desired silhouette. By setting the weight to 79kg, I achieved a Waist of 91.76cm and High Hip of 109.36cm. From there, I fine-tuned the measurements to a Waist of 92cm and High Hip of 112cm.

  • Head Size: To correct the head proportions, I set the average female head circumference to 56cm.


I will save these avatar settings for future use. I’ll also share this avatar file for those who might find it helpful!


Pattern Design Blueprint

Please follow along with the video using the measurements I’ve provided.

[Technical Notes]

  • Waistband: The front and back waistband measurements may seem imprecise due to how dart folding is calculated in the software. Please be aware that this differs from traditional paper pattern calculations.
  • Dart Modification: I adjusted the length of the back center dart. The original dart had too much bulk; by changing the length from 4 inches to 3.5 inches, the previous protrusion was flattened to follow the body line smoothly.


[Next Steps]I plan to conduct a second muslin fitting (toile) of the paper pattern within this week. I have already pre-washed, dried, and ironed the 14-count cotton calico.

Due to the limitations of video production, some detailed steps may be omitted. Additionally, since I do not currently own an overlocker (serger), the overlocking process will be skipped, as well as the detailed ironing and seam allowance marking phases.
 
Last edited:
Hello, fellow forum members!

In this first post, I’d like to explain the theory behind drafting a Tight Skirt (Pencil Skirt) and share my basic calculation methods.

I use a 23-inch ruler, so my workflow involves calculating in centimeters first and then converting those figures into inches to match my physical tools.


The Standard: Size 88 (KR)

For this design, I am using Size 88 measurements. These represent the average body dimensions for this size category (Waist, Hip, Hip Length, and Skirt Length).

Why use "Average" sizes instead of personal measurements?

As a beginner, using individual body measurements can lead to errors because personal "reference lines" are often inconsistent. By establishing a solid baseline using average body measurements first, it becomes much easier to apply custom alterations later.


My Goal

I want to share the process of finding problems and discovering solutions while drafting for a standard figure. As a hobbyist, my designs aren't perfect yet, but I am driven by the desire to create perfectly fitted, customized clothing through iterative refinement. I'm sharing everything here so we can all learn how to identify and fix pattern issues together.

My Rule of Thumb: I stick to a 3-fitting rule (making three muslin prototypes). Before cutting fabric, I always create a "Pattern Sample Work Sheet" to guide the process.

Feel free to share or use this information if you are a fellow hobbyist! I plan to continue uploading my project progress here. I appreciate your interest!


Average Measurements for Size 88 (Women)

(Note: These are standardized tailored measurements, not specific to one individual.)

  • Waist Circumference: 92 cm
  • Hip Circumference: 112 cm
  • Hip Length: 20 cm
  • Total Skirt Length: 60 cm


Drafting Tips

  1. Ease Allowance: It is best to add 2–4 cm of ease to the hip circumference. Since I am using 14-count cotton calico (muslin) with no stretch, I have opted for 4 cm of ease.
  2. Dart Distribution: Usually, 3D volume is created with two darts in the back and one or two in the front. To accommodate abdominal protrusion, I have distributed the darts 2:2 (Front:Back). I chose this because waistbands sometimes sit at or below the navel; without proper dart placement to follow the curve of the abdomen, the fabric can look awkward or "protrude" flatly. This is a hypothesis I am testing!
  3. Front vs. Back Balance: For figures with a prominent abdomen, raising the back waistline by 0.5–1 cm above the base line during drafting helps prevent the skirt from "hiking up" in the front when worn.


[ Calculation Logic: Front Panel ]

0. Basic Dart Distribution

  • Total Dart Amount: (H/4) - (W/4)
  • 28cm - 23cm = 5cm
  • Distribution: Front 2 cm / Back 3 cm

1. Basic Hip Line (H-Line)

  • Width:(H/4) / 2.54 + Ease = 11.25 inches
    • 112cm / 4 = 28cm
    • 28cm / 2.54 = 11.02 inches
    • 11.02 + Ease = 11.25 inches
  • Vertical (Hip Length):
    • 20cm / 2.54 = 7.87 inches
    • 7.87 + Ease = 8 inches
  • Drop Value: 0.25 inches

2. Basic Waist Line (W-Line)

  • Width:[(W/4) + 2cm(Darts)] / 2.54 + Ease + 0.5 inch (Extra Ease) = 10.5 inches
    • 92cm / 4 = 23cm
    • 23cm + 2cm = 25cm
    • 25cm / 2.54 = 9.84 inches
    • 9.84 + Ease = 10 inches
    • 10 + 0.5 = 10.5 inches
  • Vertical: Skirt Length - Hip Length = 15.75 inches
    • 60cm - 20cm = 40cm
    • 40cm / 2.54 = 15.75 inches

3. Dart Reference Lines

  • W / 3 (Tri-sectioning): 10.5 inches / 3 = 3.5 inches
  • Dart Width Distribution: Center Front 1 cm / Side 1 cm
  • Dart Length: Center Front 5.25 inches / Side 4.75 inches
  • Dart Point Shift: Move 0.25 inches toward the side seam.

I know the conversion between cm and inches can be confusing! I am working on a YouTube video to explain this more clearly. I will share the calculation method first, followed by a private video link showing the actual drafting process.

If you have any questions, please let me know! I will try to answer them in my upcoming videos.

A quick reminder: I am a beginner sharing my personal journey based on calculations I've studied online. I may not be familiar with professional industry-standard "shortcuts," so I ask for your kind understanding if I can't answer highly technical professional queries!

Thank you!
Hi Lumi,
Try the Tailor Base Patterns web application, you can generate the skirt base pattern with your specific measurements and download the pattern for free!
 
Back
Top